Virtual Fitness: How To Do Dumbbell Reverse Lunge

Dumbbell Reverse Lunge

Description: The Dumbbell Reverse Lunge is a strength training core stabilization exercise that develops upper and lower arm, leg and thigh strength.
Instructions: Hold the dumbbells at your sides as if you’re going to do a Hammer Curl. As you bend your elbows to begin the exercise, turn the dumbbells upward so that both hands face the ceiling. Slowly step back into a Reverse Lunge as you perform the bicep curl.
Tempo: The model in this video is moving quickly throughout. I recommend that you slow down your movement until you get the hang of it, to avoid loss of balance. Failure isn’t funny, when it comes to working with hand weights.
Caution: This exercise requires the ability to stabilize your body as you step back while moving the dumbbells. If you’re unable to steady your movement, do the modification. Move slowly. This is not a beginner exercise.
Modification: Perform the exercise without the dumbbells. Place your hands on your hips, until you improve your ability to stabilize your body while moving into the Reverse Lunge.
EXERCISE DOs and DONTs – As with all exercise programs, when using exercise videos that appear on this site, you need to use common sense. If your muscles are weak, either do the modifications, or don’t attempt this exercise if it’s too difficult for you. When starting an exercise program, be sure to discuss your plans with your healthcare provider

Virtual Fitness: How To Do Walking Dumbbell Lunge

Walking Dumbbell Lunge


Instructions: Alternate stepping forward with right and then left foot. Hold and stabilize between steps. As strength increases, add more weight to increase challenge.
Modifications: 1) Take smaller steps forward and bring both feet together after each step. 2) Place hands on hips instead of holding weights. 3) Hold onto a wall with one hand, with opposite hand on your hip or at your side.
Moving Lunge Benefits: Strengthens thighs, legs and core. Improves balance.
Cautions: Slow your tempo to suit your ability. The goal is to maintain a steady pace without losing balance.
EXERCISE DOs and DONTs – As with all exercise programs, when using exercise videos that appear on this site, you need to use common sense. If your muscles are weak, either do the modifications, or don’t attempt this exercise if it’s too difficult for you. When starting an exercise program, be sure to discuss your plans with your healthcare provider

Strength Training As Self-Defense For Seniors

This is a true story that occurred in November 2019. An 82-year-old woman successfully defended herself during a home break-in in Rochester, N.Y., afterwhich the 28 year-old intruder was taken away by ambulance. Willie Murphy started lifting weights when she was 56 years old. Every senior should follow her training example.


Irene Pastore is a native New Yorker, health and fitness blogger, and personal trainer. She owns this website, and authors each blog post. To read her complete bio, visit the About Page.


Equipment Of The Month: Sandbells

EQUIPMENT TYPE: Sandbells are sandbags with a built-in handle that enables the user to use a firm grip. Sandbells range in weight from 2 lbs. up to 50 lbs.

HOW TO USE SANDBELLS: Use a Sandbell the same way you would use other free weights. You can perform similar exercises as with a dumbbell, kettlebell or medicine ball. Sandbells are very safe.

WORKOUT: The Sandbell is harder to control than a medicine ball, because of its unpredictable movement, making it a good choice for core workouts. It also challenges grip strength.

PORTABILITY: Because it’s bulky, and unwieldly, the Sandbell isn’t something you can throw in your pocket, carry bag, or suitcase.

DURABILITY: If the bag gets damaged, sand leaks out. There are pros and cons to every type of equipment. Eventually everything you use, will wear out, and will have to be replaced.

COST: Sandbells cost between $12.00 up to $100.00 or more, depending on size and quality.


Irene Pastore, is a Certified Personal Trainer, fitness blogger, health educator, and speaker. She has 23 years experience teaching exercise in New York City. To read her complete bio, visit the About Page.

Exercise of the Month: May 2013

MODIFIED PUSH-UP 

Start Position
Start Position

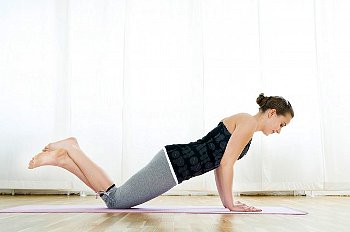
Level: Beginner to Intermediate

Equipment: Exercise Mat, Towel, (optional)

Muscles Worked: Chest, Arms, Shoulders

How to Perform the Modified Push-Up

Start Position: Get onto hands and knees with your wrists aligned under shoulders.  Cross your ankles.

Finish Position: Bend elbows and slowly lower your upper body toward the mat, until your elbows form right angles with your shoulders.  Return to start position.  Repeat for 10-12 repetitions.

Finish Position
Finish Position

Modification: Place a folded towel under your knees for extra cushion.  

Caution: Do not exceed your level of strength.  Pushing your body weight up is harder than lowering yourself down.  The stronger you are, the lower you can go.  Play it safe to avoid injury.

The actual number of repetitions is based on your strength.  If you can’t do 10 or 12 repetitions, do only what you can.  As you gain  strength, you’ll be able to take on more.

Copyright 2013 Irene Pastore and Blue Moon Personal Training

Exercise of the Month: January 2013

THE LAT PULLDOWN

Latissimus Dorsi Muscle

Type: Strength Training Exercise

Equipment:  Lat Pulldown Pulley Machine

Correct Form

  • Sit with your back straight.  With both knees forming right angles, place knees directly under the knee pad.
  • Grip the overhead bar slightly wider than your shoulders.
  • Slowly pull the bar to chest level, moving elbows behind you, drawing shoulder blades together.
  • Slowly return the bar to the start position.
  • Keep movements smooth, slow and controlled.
  • Exhale as you bring the bar down.  Inhale as you release the bar up.

Lat Pulldown on Pulley Machine
Lat Pulldown 

Cautions

  • Do not bring the bar behind your neck. Doing this, may lead to injury.
  • Do not throw your head back.
  • Do not overload the bar with too much weight. Doing so, may lead to injury.
  • Do not attempt this exercise if you experience pain.
  • Do not yank the bar down.

The exercise described in this post is informational, and not meant to replace the guidance of a personal trainer in a live setting.  Exercises performed incorrectly may result in injury.

Copyright 2013 Irene Pastore and Blue Moon Personal Training