Virtual Fitness: How To Do Side Plank Hip Dip

Side Plank Hip Dip

Benefits: Core stabilization. That means you’re able to maintain a stable side plank position throughout the exercise, without flopping around on the mat, losing your balance.
Instructions: Start on your right side. Align right elbow under right shoulder. Stack feet together. Lift into a side plank. Using small movements, pulse hip up and down. Sets and Repetitions: 3 sets of 10. This isn’t a beginner exercise.
Modifications: Do fewer sets and repetitions if you can’t tolerate 3 sets of 10. For extra support, drop the bottom knee to the mat and lean on your leg with your knee directly under your hip, instead of stacking your feet together. Wrap your top arm around your waist, with arm resting on your back, instead of raising it upward.
EXERCISE DOs and DONTs – As with all exercise programs, when using exercise videos that appear on this site, you need to use common sense. If your muscles are weak, either do the modifications, or don’t attempt this exercise if it’s too difficult for you. When starting an exercise program, be sure to discuss your plans with your healthcare provider

Exercise of the Month: April 2013

ABS ON THE BALL

Starting Position
Starting Position

Level: Advanced

Style: Core Stabilization

Equipment: Exercise Ball, Exercise Mat, Athletic Shoes (optional).

Muscles Worked: Abs

How To Perform Abs On The Ball

  • Get onto all fours with wrists under shoulders, and knees under hips.  Slide the ball under your abdomen.  
  • Slowly move into a downward plank position and roll the ball under your legs, as shown in Starting Position.
  • Slowly pull your tailbone upward toward the ceiling, until your body forms a V, as shown in Finish Position.
  • Return to Start Position and repeat for 10-12 repetitions, or fewer depending on tolerance.

Modifications

Finish Position
Finish Position

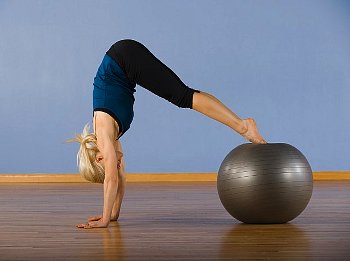
Place the ball under your thighs, instead of your legs.  Placing the ball closer to your feet, makes the exercise more difficult.

Correct Technique

  • Move slowly throughout.
  • Avoid shaking.
  • If you experience discomfort, or pains in your wrists, stop the exercise.
  • The exercise can be performed with, or without wearing athletic shoes.

Cautions

  • Do not perform this exercise if you lack shoulder, abdominal, or forearm strength.
  • Do not perform this exercise if you are a beginner, if you’re in a hurry, or showing off in front of friends.  Injuries aren’t worth it.
  • Use the correct size exercise ball.

Copyright 2013 Irene Pastore and Blue Moon Personal Training

Exercise of The Month: February 2013

SIDE LEG LIFTS

Exercise Type: Core Stabilization

Muscles Worked: Outer Hips, Inner Hips, Back, Shoulders, Oblique Abdominals, Transverse Abdominals.

SIDE LEG LIFTS
SIDE LEG LIFTS

HOW TO PERFORM SIDE LEG LIFTS

Lie on your right side with your head resting on your right hand, legs together.  Place left hand in front of you.

Breathe in deeply.  Exhale and lift both legs up, as shown in the photograph.  Keep edges of both feet together.

Exhale as you release both legs to the starting position.

Repeat the exercise on your left side.

MODIFICATION

If you can’t lift both legs at the same time, try lifting the top leg only.  As you get stronger, try lifting the bottom leg to tolerance.

Stop the exercise if you experience discomfort or pain.

CORRECT TECHNIQUE

  • The goal of this exercise is to keep your body steady while lifting both legs.
  • Do not allow your shoulders or hips to sway back and forth.
  • Maintain a steady position with your head, neck and shoulders.

Copyright 2013 Irene Pastore and Blue Moon Personal Training